|
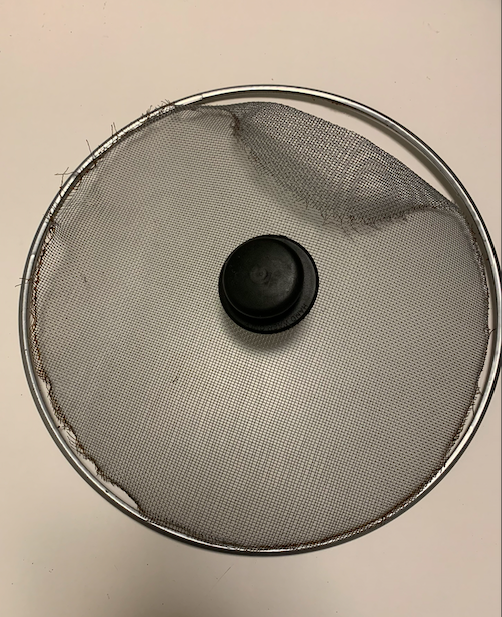
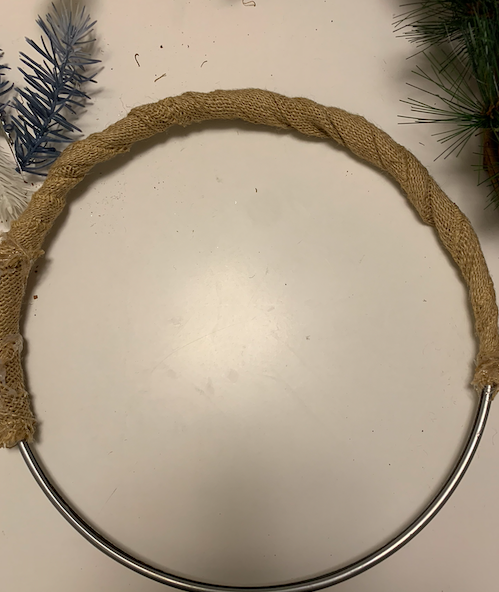
I had to come back to this DIY because it's winter now, not fall, so that means I needed a new wreath - duh! Similar to last time I went to Value Village in Regina to find supplies. This time around I really wanted to use a different approach and supplies. Part of learning is exploring new approaches. I went into it knowing that I wanted something that I could put up for all of winter. So no Christmas themed wreaths for me, please! To do this I first searched the web. I found inspiration photos from Pinterest first, you can see them here. Although this is no different than last time, I know that this helps my learning because I can visualize what I like and dislike and, therefore, set myself up for success. I would expect my students to do the same as they plan for any type of project. Then, I found an online magazine article to base my process on. Do people even read print magazines anymore? I will be referring back to this after this course is finished for more DIY ideas to do over the holidays. Not only did this article give me a list of materials and steps to make a wreath, it also provided an extra learning opportunity about the history of wreaths! Check it out if you don't know why wreaths are even a thing - I sure didn't. Based on the photos I saw and saved, I knew I wanted to use a wire frame. I needed something for this, as there were no wire wreath frames available at Value Village. So, I wondered to the home isles. That's where I found a bacon cover (is that what it's called?). The frame is the perfect size, so I ripped out the inside netting and voila! It was really gross - heads up if you try this. I had to clean it for my own sanity. If I hadn't found this to use as a frame, I had a plan for what I would try instead. I also knew I wanted to only cover the bottom half and leave the rest of the frame visible, as per my inspiration photos. I didn't post these blog posts due to what I heard from this podcast episode. The host and a the guest discuss the need to separate from an image of a finished project and to instead make a list, or simply put a name to what you want to make. Anyways, the greasy frame was an eyesore, so I covered that real quick with burlap - another favourite decor item of mine. Then, as I was thinking of my colours and items to use, I realized that the surface area of the metal frame was slim to none on the bottom. I didn't have confidence that I would be able to fit very much on it, or that things would stick well. So, more burlap (yay for burlap!). You can see each stage of my thinking in the photos below. I had to glue more items on to make it more full, but I really like the minimal look, just as the article described. Part of learning is teaching. Part of learning is modelling. This time my sister did this project with me, which also contributes to the learning process since the environment is different. If you recall, the previous time a made a wreath with a well-seasoned-wreath-making friend. Whereas, my sister has never made a wreath before, so she was hesitant, much like I was the first time. Because of choosing to approach this a second time, I observed that was very careful and diligent with how she placed her items on her wreath. She chose items in odd-numbered groups and placed them, only after a lot of thought and consideration. She pondered the size of her wreath, where she should start, if she should also wrap her wreath in burlap like I did, what colours to use, where she should place each item, how many of each item to use, etc. etc. The list went on. I bring this up because the learning process does not stop with me and my projects, it goes beyond that. Using my experiences to help others with a similar task is important to learning for the teacher and the learner. Curious to see how it turned out? Check it out. 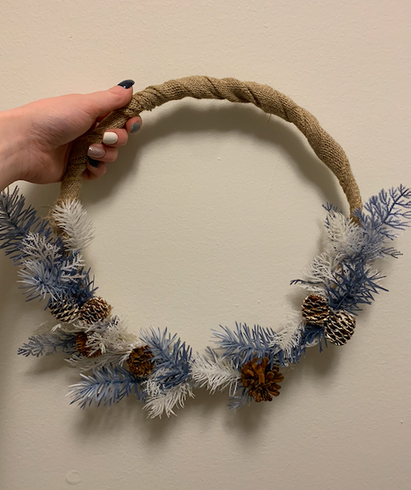
Finished product.
3 Comments
iram.usmani
27/11/2020 12:39:37 am
Awesome wreath Erin !! and yes people still read paper print magazines ..That's me . Not sure if someone will do it in next generation though.
Erin Zinger
28/11/2020 10:44:17 pm
Thank you!
Kara Miskolczi
6/12/2020 01:06:33 pm
This is the cutest little Christmas-y decoration. I am definitely going to be making this for my apartment. Your pictures make it super easy to follow along! Leave a Reply. |
Categories
"instagram logo copyright free Virginia State Parks" by vastateparksstaff is licensed under CC BY 2.0

"Copyright free Pinterest logo Virginia State Parks" by vastateparksstaff is licensed under CC BY 2.0

"youtube logo" by redsoul300 is licensed under CC BY-NC 2.0

"Google Logo Search" by theglobalpanorama is licensed under CC BY-SA 2.0
"cc-logo" by openDemocracy is licensed under CC BY-SA 2.0
|


 RSS Feed
